CVE-2024-49113: LDAPNightmare - What You Need to Know

CVE-2024-49113, also known as “LDAPNightmare,” is a critical Windows LDAP Denial-of-Service (DoS) vulnerability. It affects the LdapChaseReferral function in wldap32.dll and allows unauthenticated attackers to crash the Local Security Authority Subsystem Service (LSASS), causing system reboots. This issue is particularly concerning due to the public release of a proof-of-concept (PoC) exploit.

Key Risks

  • Exploitation: Attackers can use malicious CLDAP referral responses to trigger LSASS crashes.
  • Public PoC: The release of an exploit named “LDAPNightmare” increases the likelihood of attacks.
  • Malware Risks: Fake PoCs containing information-stealing malware are being distributed to target researchers and administrators.
  1. Apply Patches: Install Microsoft’s December 2024 security updates to address the vulnerability.
  2. Monitor Network Activity: Look for suspicious CLDAP traffic and abnormal DNS SRV queries.
  3. Exercise Caution with PoCs: Only download PoCs from trusted sources to avoid malicious files.

This vulnerability poses a significant threat, especially with a publicly available PoC. Organizations should patch their systems and monitor for exploitation attempts immediately.

For more details, visit Microsoft Security Guidance.

Is AIOps the Future? Replacing Legacy ITOps with KeepHQ

KeepHQ Alert Management

The world of IT operations is evolving at breakneck speed. Traditional ITOps (IT Operations) tools are struggling to keep up with the demands of modern infrastructure, which is increasingly dynamic, distributed, and complex. Enter AIOpsa game-changing approach that leverages artificial intelligence to streamline operations, improve efficiency, and reduce downtime. One of the most promising platforms in this space is KeepHQ, an open-source AIOps and alert management solution.

In this blog, well explore why AIOps is becoming the future of IT operations and how KeepHQ can replace legacy ITOps applications.


The Limitations of Legacy ITOps

Traditional ITOps tools were built for an era where static infrastructure and monolithic applications were the norm. Today, these tools face several challenges:

  1. Alert Fatigue: Too many alerts from disparate tools overwhelm teams.
  2. Lack of Context: Legacy systems often lack the intelligence to correlate alerts and identify root causes.
  3. Manual Processes: Time-consuming, manual workflows lead to slower incident resolution.
  4. Scalability Issues: Struggles to handle the complexity of modern cloud-native environments.

With these limitations, organizations are seeking smarter, more agile solutionsand AIOps is stepping up to fill the gap.


What is AIOps?

AIOps (Artificial Intelligence for IT Operations) combines machine learning, big data, and automation to:

  • Analyze vast amounts of IT operations data in real-time.
  • Detect patterns and anomalies.
  • Automate repetitive tasks.
  • Provide actionable insights for proactive problem resolution.

The goal of AIOps is simple: to make IT operations smarter, faster, and more efficient.


Why KeepHQ?

KeepHQ is an open-source AIOps platform that excels in alert management and incident response. Its designed to address the key pain points of traditional ITOps while being flexible and cost-effective. Heres why you should consider replacing your legacy ITOps application with KeepHQ:

1. Centralized Alert Management

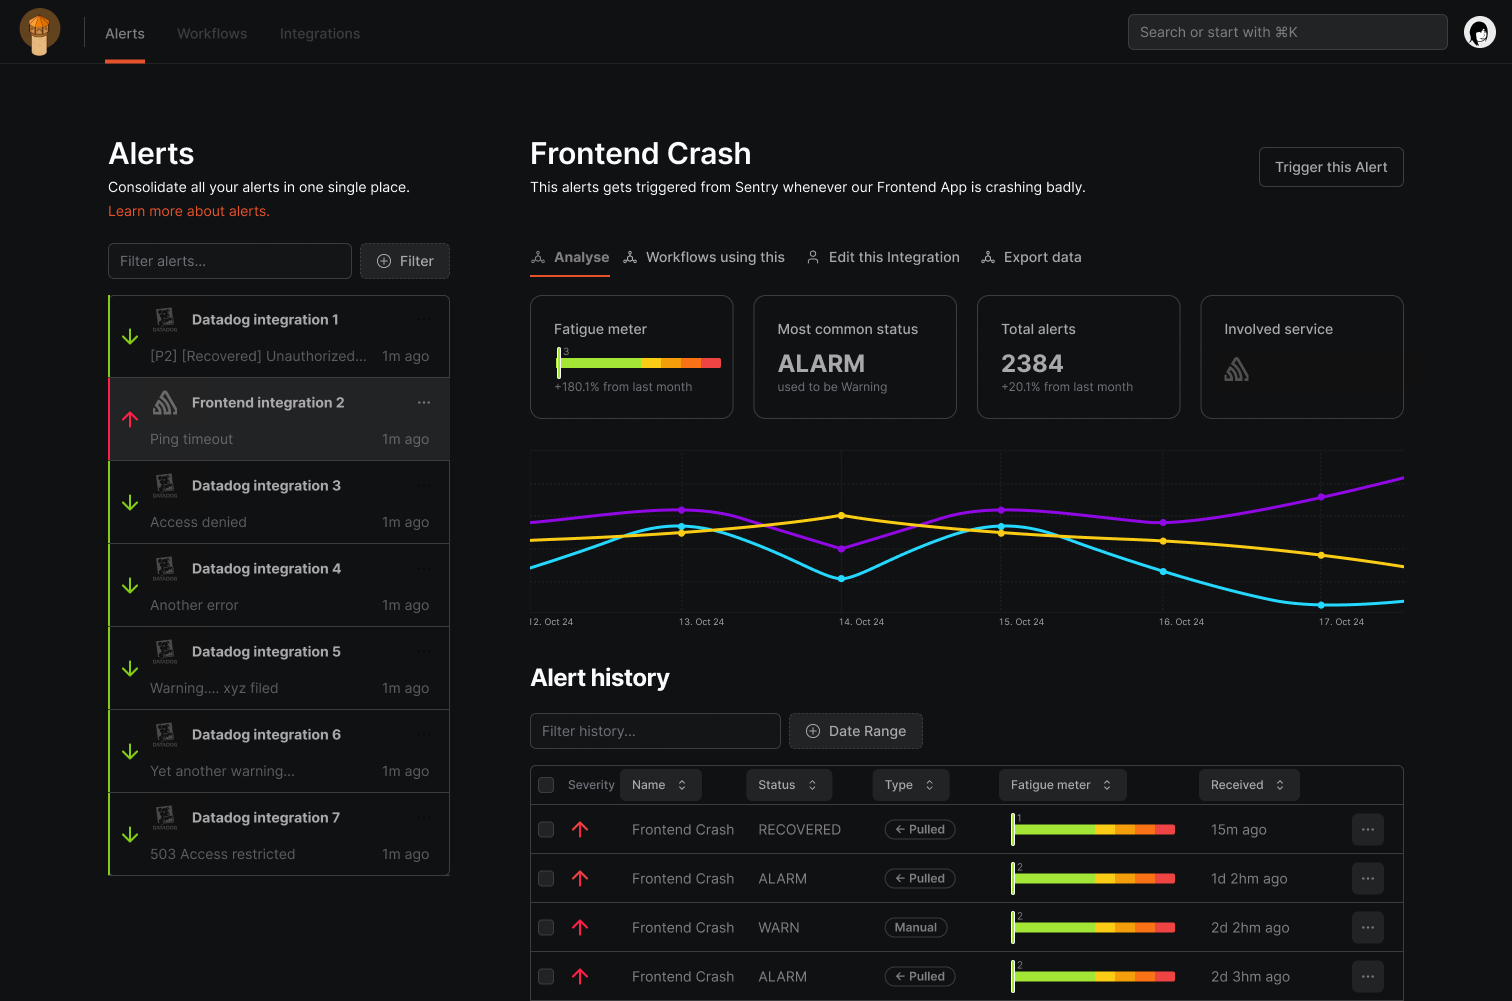
KeepHQ consolidates alerts from multiple monitoring tools into a single, unified dashboard. Say goodbye to juggling multiple systems and hello to streamlined operations.

2. AI-Driven Insights

KeepHQ uses machine learning to group related alerts, identify patterns, and reduce noise. This means fewer distractions and more focus on critical issues.

3. Customizable Workflows

Unlike rigid legacy tools, KeepHQ allows you to define custom workflows for escalations and automated responses. Adapt the platform to your teams unique needs.

4. Open-Source Advantage

KeepHQs open-source nature means lower costs and greater flexibility. Youre not locked into proprietary solutions, and you can contribute to its ongoing development.

5. Seamless Integrations

Integrate KeepHQ with your existing tools like Prometheus, Grafana, Slack, and more. Its designed to fit seamlessly into your tech stack.


Benefits of AIOps with KeepHQ

Adopting AIOps with KeepHQ can transform your IT operations in the following ways:

  • Improved Productivity: AI-powered noise reduction and incident correlation save valuable time.
  • Enhanced System Reliability: Proactively detect and resolve issues before they impact users.
  • Cost Efficiency: Open-source KeepHQ eliminates expensive licensing fees.
  • Future-Proofing: Prepare your operations for the complexities of tomorrows infrastructure.

Is AIOps the Future?

The answer is a resounding yes. As IT environments grow more complex, traditional tools simply cant keep pace. AIOps is the natural evolution of IT operations, bringing intelligence, automation, and agility to the forefront. KeepHQ, as an open-source AIOps platform, is an excellent choice for organizations looking to modernize their operations while keeping costs under control.


Ready to Make the Switch?

Replacing your legacy ITOps application with KeepHQ is more than just a technology upgradeits a strategic move toward a smarter, more efficient future. With its AI-driven capabilities and open-source flexibility, KeepHQ empowers teams to stay ahead in an ever-changing landscape.

Explore KeepHQ today and embrace the future of IT operations.


DeepSeek R1 vs. OpenAI o1 - A Competitive Analysis

Yes, DeepSeek R1 has made significant strides in catching up with OpenAI’s o1 model, particularly in terms of performance, cost-efficiency, and accessibility. Heres a detailed analysis of how DeepSeek R1 compares to OpenAI o1:

1. Performance Benchmarks

DeepSeek R1 has demonstrated competitive performance in various benchmarks, often matching or even surpassing OpenAI o1 in specific tasks:

  • Mathematical Reasoning: In the AIME 2024 test, DeepSeek R1 scored 79.8%, slightly outperforming OpenAI o1-1217’s 79.2%. In the MATH-500 test, DeepSeek R1 achieved a remarkable 97.3%, comparable to OpenAI o1-1217’s 96.4%.
  • Programming Tasks: DeepSeek R1 achieved a Codeforces Elo rating of 2029, surpassing 96.3% of human participants, which is slightly better than OpenAI o1-1217’s performance.
  • General Knowledge (MMLU): While OpenAI o1-1217 scored 91.8%, DeepSeek R1 scored 90.8%, showing a minor gap in general knowledge tasks.

2. Training Innovations

DeepSeek R1 introduces a novel training approach, relying heavily on reinforcement learning (RL) with minimal supervised fine-tuning (SFT). This method allows the model to “self-learn” through trial and error, mimicking human problem-solving more closely. Key innovations include:

  • Cold-Start Data: DeepSeek R1 uses a small set of high-quality, human-annotated data to improve readability and reasoning accuracy.
  • Two-Stage RL: The model undergoes two rounds of reinforcement learning to optimize reasoning and align with human preferences.
  • Emergent Behavior: During training, DeepSeek R1 exhibited “aha moments,” where it spontaneously developed complex behaviors like self-reflection and alternative problem-solving strategies.

3. Cost-Effectiveness

DeepSeek R1 is significantly more affordable than OpenAI o1:

  • API Pricing: DeepSeek R1’s API costs $0.14 per million input tokens (cache hit) and $2.19 per million output tokens, which is 96.4% cheaper than OpenAI o1’s pricing.
  • Open-Source Advantage: DeepSeek R1 is fully open-source under the MIT License, allowing free commercial use and customization, unlike OpenAI’s proprietary models.

4. Model Distillation

DeepSeek R1 has distilled smaller models (ranging from 1.5B to 70B parameters) that outperform OpenAI o1-mini in specific tasks. For example, the 32B and 70B distilled models achieve performance comparable to OpenAI o1-mini while being more cost-effective.

5. Open Ecosystem

DeepSeek R1’s open-source nature and MIT License make it highly accessible for developers and enterprises. It also supports model distillation, enabling users to create smaller, task-specific models based on R1’s architecture.

6. Real-World Applications

DeepSeek R1 excels in tasks requiring advanced reasoning, such as:

  • Mathematical Problem Solving: Its Chain-of-Thought (CoT) reasoning capabilities make it ideal for STEM tasks.
  • Programming Assistance: It provides accurate and efficient code generation and debugging.
  • Educational Tools: Its ability to explain solutions step-by-step makes it valuable for teaching and learning.

Conclusion

DeepSeek R1 has not only caught up with OpenAI o1 but also introduced innovative training methods, cost-effective solutions, and an open ecosystem that democratizes AI development. While OpenAI o1 still holds an edge in general-purpose tasks, DeepSeek R1’s specialization in reasoning-intensive tasks and its affordability make it a strong competitor in the AI landscape.

Codefinger Ransomware Campaign Targets AWS Users via SSE-C

A new ransomware campaign by the threat actor Codefinger has been confirmed in a January 13 report from the Halcyon Threat Research and Intelligence Team. This campaign specifically targets Amazon Web Services (AWS) users by exploiting AWSs server-side encryption with customer-provided keys (SSE-C). By leveraging SSE-C, Codefinger encrypts user data and demands payment for the symmetric AES-256 keys required for decryption.

How the Attack Works

  1. Integration with SSE-C:
    Codefinger exploits SSE-C by encrypting user data through AWSs secure infrastructure. The encryption process relies on a symmetric AES-256 key supplied by the customer.

  2. Demand for Ransom:
    Once data is encrypted, Codefinger demands payment for the AES-256 decryption keys. Without these keys, data recovery is impossible.

  3. Challenges of SSE-C:
    Due to SSE-C’s design, AWS cannot assist with recovery if the encryption keys are unavailable, making this attack particularly effective.

Why This Campaign is Dangerous

  • SSE-Cs Secure Design:
    While SSE-C provides robust encryption by allowing customers to manage their own keys, this feature is exploited by the attackers to hold data hostage.

  • Limited Recovery Options:
    Traditional recovery methods, such as snapshots or backups, are ineffective without the original keys.

  • Growing Cloud Threats:
    This campaign highlights the increasing sophistication of ransomware targeting cloud services, which are critical for many businesses.

Recommendations for AWS Users

To mitigate risks associated with this ransomware campaign, AWS users should adopt the following practices:

1. Key Management Practices

  • Use a secure, segregated system for managing encryption keys.
  • Regularly rotate keys and maintain offline backups.
  • Avoid reusing keys for multiple datasets or environments.

2. Enhanced Monitoring

  • Monitor access logs and key usage patterns for anomalies.
  • Implement real-time alerts for changes to encryption configurations.

3. Data Protection Measures

  • Maintain offline backups of critical data that are not encrypted using SSE-C.
  • Consider using AWS Key Management Service (AWS KMS) to reduce risks associated with customer-provided keys.

4. Incident Response Planning

  • Develop a ransomware-specific response plan that includes coordination with cybersecurity experts and AWS support.
  • Test recovery scenarios to ensure backups and key rotations align with business continuity objectives.

5. Security Training

  • Educate teams on the risks associated with SSE-C and ransomware threats targeting cloud environments.

Conclusion

The Codefinger ransomware campaign demonstrates the potential vulnerabilities of even the most secure cloud services when mismanaged. By exploiting SSE-C, attackers have created a dangerous new threat that requires proactive defenses and robust key management strategies. AWS users must take immediate steps to secure their data and protect their encryption keys to mitigate the impact of such attacks.

Is Spring Cloud Gateway an Alternative to Kong

API Gateways are essential components of modern microservices architecture, acting as intermediaries between clients and backend services. Among the many available options, Spring Cloud Gateway and Kong API Gateway are two popular choices. But can Spring Cloud Gateway truly be considered an alternative to Kong? Lets explore their features, use cases, and differences to answer this question.


Overview

Spring Cloud Gateway

  • Focus: Tailored for Java-based microservices applications, particularly in the Spring Boot/Spring Cloud ecosystem.
  • Deployment: Can run as part of your application (embedded gateway) or as a standalone service.
  • Customization: Highly customizable through Java programming.

Kong API Gateway

  • Focus: A high-performance, standalone gateway designed for general API management.
  • Deployment: Typically deployed as a standalone service and often paired with Kong Konnect for enterprise features.
  • Customization: Extensible via plugins written in Lua or other supported languages.

Feature Comparison

Aspect Spring Cloud Gateway Kong API Gateway
Architecture Java-based, tightly integrated with Spring. Language-agnostic, standalone gateway.
Use Case Best for Spring microservices. General-purpose API management.
Performance Optimized for Spring projects; suitable for moderate load. High-performance, suitable for high traffic.
Extensibility Custom filters written in Java. Lua plugins + custom support for other languages.
Ease of Use Easy if you’re familiar with Spring. User-friendly with pre-built plugins.
Enterprise Support Limited to Spring ecosystem tools. Advanced features in Kong Konnect (paid).

Key Features

Spring Cloud Gateway

  • Route matching and forwarding.
  • Rate limiting and request throttling.
  • Path rewriting and filters.
  • Integration with Spring Security, Eureka, and other Spring components.
  • Resilience patterns like Circuit Breakers (Resilience4j/Hystrix).

Kong API Gateway

  • API rate limiting, authentication, and logging.
  • Multi-protocol support (HTTP, gRPC, WebSocket, etc.).
  • Clustering and horizontal scaling.
  • Pre-built plugin ecosystem for common use cases.
  • Integration with CI/CD tools and modern infrastructure like Kubernetes.

Pros and Cons

Spring Cloud Gateway

Pros:

  • Seamlessly integrates with Spring Boot and Spring Cloud.
  • Simple and lightweight for Java-based systems.
  • High customizability.

Cons:

  • Not as feature-rich for enterprise API management.
  • Performance and scalability are limited compared to Kong.

Kong API Gateway

Pros:

  • High-performance and scalable for large-scale deployments.
  • Language-agnostic, supporting a wide variety of protocols.
  • Rich ecosystem of pre-built plugins.

Cons:

  • Requires additional setup and configuration.
  • Advanced features may require a Kong Konnect subscription.

Is Spring Cloud Gateway a True Alternative to Kong?

When Spring Cloud Gateway Works as an Alternative

  • You are already using Spring Boot or Spring Cloud in your projects.
  • You need a lightweight gateway with tight integration into your Java ecosystem.
  • Your focus is on microservices with moderate traffic and internal use cases.

When Kong Remains Superior

  • You need a standalone, language-agnostic gateway for diverse systems.
  • Scalability, multi-protocol support, and enterprise-grade features are critical.
  • You prefer out-of-the-box API management capabilities and pre-built plugins.

While Spring Cloud Gateway can serve as an alternative in certain scenarios, Kong remains a more robust and versatile option for general-purpose API management and enterprise needs.


Conclusion

Spring Cloud Gateway and Kong API Gateway both excel in their respective domains. If your architecture revolves around Spring, Spring Cloud Gateway may meet your needs. However, for high-performance, enterprise-grade API management, Kong is often the better choice.

Ultimately, the decision depends on your specific use case, tech stack, and operational goals. Evaluate your requirements carefully to choose the gateway thats right for your projects.


Do you think Spring Cloud Gateway is a viable alternative to Kong? Share your thoughts in the comments below!

Deploying a Hexo Blog on Kubernetes with GitHub Actions

In this post, we’ll cover the steps to deploy a Hexo blog on Kubernetes using GitHub Actions. This setup automates the build, containerization, and deployment of the blog to your Kubernetes cluster.

Prerequisites

  1. Hexo Installed Locally: Ensure Hexo is installed and your blog is set up.
  2. Kubernetes Cluster: A running Kubernetes cluster with kubectl access.
  3. Docker Registry: A registry to store your container images.
  4. GitHub Repository: Store your Hexo blog project in a GitHub repository.
  5. cert-manager: Installed in your Kubernetes cluster for TLS certificates.

Step 1: Containerize Your Hexo Blog

  1. Generate Hexo Static Files:

    1
    hexo generate
  2. Create a Dockerfile:

    1
    2
    3
    FROM nginx:alpine
    COPY public /usr/share/nginx/html
    EXPOSE 80
  3. Build and Push the Docker Image:

    1
    2
    docker build -t <registry>/hexo-blog:latest .
    docker push <registry>/hexo-blog:latest

Step 2: Kubernetes Configuration

Deployment YAML

1
2
3
4
5
6
7
8
9
10
11
12
13
14
15
16
17
18
19
20
21
22
23
24
25
apiVersion: apps/v1
kind: Deployment
metadata:
name: hexo-blog
namespace: <namespace>
labels:
app: hexo-blog
spec:
replicas: 2
selector:
matchLabels:
app: hexo-blog
template:
metadata:
labels:
app: hexo-blog
spec:
containers:
- name: hexo-blog
image: <registry>/hexo-blog:latest
imagePullPolicy: Always
ports:
- containerPort: 80
imagePullSecrets:
- name: regcred

Service YAML

1
2
3
4
5
6
7
8
9
10
11
12
13
apiVersion: v1
kind: Service
metadata:
name: hexo-blog
namespace: <namespace>
spec:
selector:
app: hexo-blog
ports:
- protocol: TCP
port: 80
targetPort: 80
type: ClusterIP

Ingress YAML

1
2
3
4
5
6
7
8
9
10
11
12
13
14
15
16
17
18
19
20
21
22
23
24
25
apiVersion: networking.k8s.io/v1
kind: Ingress
metadata:
name: hexo-blog-ingress
namespace: <namespace>
annotations:
nginx.ingress.kubernetes.io/rewrite-target: /
cert-manager.io/cluster-issuer: "letsencrypt-prod"
spec:
ingressClassName: nginx
rules:
- host: <your-domain>
http:
paths:
- path: /
pathType: Prefix
backend:
service:
name: hexo-blog
port:
number: 80
tls:
- hosts:
- <your-domain>
secretName: hexo-blog-tls

Step 3: GitHub Actions Workflow

Create a .github/workflows/deploy.yml file in your repository:

1
2
3
4
5
6
7
8
9
10
11
12
13
14
15
16
17
18
19
20
21
22
23
24
25
26
27
28
29
30
31
32
33
34
35
36
37
38
39
40
name: Deploy Hexo Blog

on:
push:
branches:
- main

jobs:
build-and-deploy:
runs-on: ubuntu-latest

steps:
- name: Checkout code
uses: actions/checkout@v3

- name: Set up Node.js
uses: actions/setup-node@v3
with:
node-version: '18'

- name: Install Hexo
run: |
npm install
npm install -g hexo-cli
hexo generate

- name: Build Docker image
run: |
docker build -t <registry>/hexo-blog:latest .
echo "${{ secrets.REGISTRY_PASSWORD }}" | docker login <registry> -u "${{ secrets.REGISTRY_USERNAME }}" --password-stdin
docker push <registry>/hexo-blog:latest

- name: Deploy to Kubernetes
env:
KUBECONFIG: ${{ secrets.KUBECONFIG }}
run: |
kubectl apply -f deployment.yaml
kubectl apply -f service.yaml
kubectl apply -f ingress.yaml
kubectl rollout restart deployment hexo-blog -n <namespace>

Step 4: Verify the Deployment

  1. Check the Pods:

    1
    kubectl get pods -n <namespace>
  2. Access the Blog:
    Navigate to https://<your-domain> in your browser.


Conclusion

By automating the build and deployment of your Hexo blog using GitHub Actions, you save time and ensure consistency in your releases. This setup is scalable and can be extended with monitoring and logging for production environments.

Let me know if you have any questions or need further assistance!